Two good registry and PC cleaning tools

To keep your computer clean, inside and out, is often a challenge! I’m not talking about the dust and dirt that tends to accumulate in your computer’s case, but the nasty stuff that tends to cause your computer to become slower, little by little as you use it regularly.

I’m sure this is a problem you are familiar with, you bought a computer and the first thing you notice how fast it is. Everything runs without a hitch and programs are snappy like the beat of a well versed drum.

However 6 months later you start noticing a few things. It first starts out with programs needing to take a couple of extra moments to open, surfing the web starts to become a chore as things feel like they come to a crawl at moments. Even something such as turning on your computer seems to take forever and ever and ever. “This cannot be right!” you have probably thought to yourself, and you are correct!

Much like a motor car, a computer needs their fair amount of touch, love, & care. The problem is, if you are not sure exactly what to do, then you could end up playing around and damaging your computer. This is why, unless you are a PC expert, you should stick to using programs to help you do the fiddling!

The first thing you notice once you start searching for a good, safe, & efficient computer cleaner software is that there are a ton of them, more than you or I could ever count! Being the computer savvy person I am, it’s with the most honorable intent that I present to you the software that I personally feel does the best job. Some PC cleaning software can be dangerous, if it is not well made, or designed to damage your system, you could get negative effects. Check the software has lots of good reviews, if from a trusted source and experts like it, before you go downloading it onto your PC.

My favorite PC cleaner is CCleaner, which I think is an amazing little program. With a quick and simple Google search it is bound to come up – easily available on internet, if you’re unsure as to where to download it, always try to get it from the official website.

A screenshot of the CCleaner interfaceThis program is super handy because it clears out the majority of junk and trash you have incidentally stored and have hidden away in places you wouldn’t have imagined! When you launch the program you’re going to be presented with a handy onscreen menu; you should select ‘analyze’ and then ‘run cleaner’. Once completed you’ll notice that a whole lot of space on your computer has been freed and a sense of speed has been restored to your machine.

The second program that I would like to recommend is Glary Registry Repair which is a dandy little tool that I highly recommend, because I have seen it perform some truly glorious work.

Mostly everyone has heard of a computer registry, and that at times their registry becomes out of sync due to the programs that they have installed and uninstalled over time making incremental changes as it goes along.
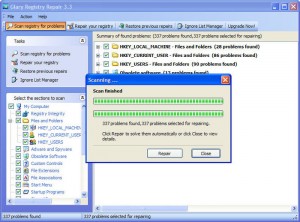
A screenshot of the Glary Registry Repair interfaceGlary Registry Repair attempts to help you spot and fix the errors in your registry, so that your computer can run faster.

There are many different programs that you can use to speed up your computer and clean your registry. These are my personal favorites, however feel free to choose your own.

How to identify prevent and fix laptop overheating

For the last few years, the sale of laptops has increased by 25% whereas the sale of desktop machines has reduced. Along with increasing demand for laptops and a change in times, technology has been upgraded.

Day by day laptops are getting thinner, more compact, lighter, and better in terms of performance. Because of this, laptops are now being put into smaller and smaller casing, which increases the threat of overheating, as there is less room for air to circulate.

If your laptop overheats, it can cause permanent hardware damage or failure. In this article, I will try to teach you about how to identify, prevent and fix laptop overheating.

An overheating laptop

Symptoms of Laptop Overheating

Below are the three points which can help out to identify if your laptop is overheating.

  • Sudden shut-down, done by the operating system to prevent hardware damage
  • The fan speed increases – you should be able to here this
  • A reduction in the laptops performance – things load slower, the CPU is busy more often etc.

The Root Cause of Laptop Overheating

Laptop overheating occurs due to insufficient cooling. This usually happens because either your laptop is clogged up with dust, blocking ventilation, or because a thermal grease compound is getting stocked between your CPU and the heat sink – the big metal cooler that is usually linked to the fan.

Steps to prevent or fix Laptop Overheating

Option 1 – External cooler

You could purchase an external cooler. This is a cooling pad you place your laptop on, and it keeps cool air circulating around the laptop. Before you but a cooling pad, it is important to understand the flow of air in and out of your laptop.

Cooling pads are more useful/effective when used on laptops with air vents on the base of the device. Cooling pad connect via USB, and consumes some of the laptops power – not a problem if you are plugged in. Usually these pads cost around £5-20 GBP.

Option 2 – Get a strong and level base

Most laptops have their ventilation grills on the bottom of the device. Therefore if you keep them on an uneven surface, such as a bed, lap or pillow, disturbance is caused to the airflow. Keeping your laptop on a hard surface, like a table or a strong hard tray is likely to get you good air flow..

Option 3 – Internal cleaning

The above two methods were external methods, however this method will require taking your laptop apart and putting it back together again – so only do it if you are confident you know what you are doing!

This step is about removing your laptops casing to clean out any dust or dirt that might be restricting the airflow. Most laptops have downloadable user manuals, which can tell you all about the internals of your laptop, and how to take it apart, in order to clean it. This can void your warranty, so be careful and do your research! If you are not confident, you could of course take it to your local computer repair shop, and ask them to clean it.

If you are doing it yourself, once you have opened your laptop, you will need to clean the fans which provide cooling to graphics card and CPU. Before you do this, make sure that it is shut down and the battery is removed – don’t electrocute yourself! For thermal grease you may need to use a cotton swab, dipped in stain remover to remover.

For full, comprehensive instructions, research it yourself, and do not start opening your laptop up until you know what you are doing!

The causes and how to fix lines on printouts

If you own a printer, chances are you’ll experience some sort of trouble with it at some point, if you haven’t already. One of the most common ailments plaguing printers is horizontal lines across the page – lines you didn’t ask to be there.

The good news is that there are several steps you can take to try to cure this problem before having to call in a professional or replace the printer entirely.

Basic Causes and Fixes

Fortunately, most fixes for horizontal lines fall into this category. It’s always a good idea to start with the simplest, easiest remedies before taking more drastic measures and risking further damage.

Ink level is low
This is one of the most common reasons unwanted lines appear on printouts. If your printer is running out of ink, simply replace or refill your ink cartridges following the manufacturer’s instructions and recommendations.

Often new printers come with ink cartridges that are either low on ink or have ink cartridges that have dried out from lack of use while sitting on the shelf. If you’ve just purchased a new printer, double-check the cartridges that came with it.

Settings are incorrect
It can make a big difference in the quality of your printout if your settings are not correct. Check the following:A woman with a hammer about to hit a printer

  • Paper type – Make sure the paper type selected matches the paper you are actually using. Printing photos and the use of photo paper is especially affected by incorrect settings.
  • Print quality – Settings usually offer a choice between Draft, Normal and Best. Select the highest quality possible.
  • Color or black and white – Select “Color” printing even if you are printing a document that is only in black and white. While it may seem counterintuitive, some printers that have separate colour and black and white cartridges use ink from both cartridges – even for black and white documents. Choosing the “Color” option will often fix horizontal lines appearing in black and white printouts.
  • Speed – Turning off high speed printing mode often eliminates unwanted lines.


Test, clean, and align
Part of good printer maintenance is periodically running your printer through a cycle of test, clean, and align – even when there aren’t problems. This helps keep the printer operating smoothly. It’s also a good basic step toward resolving problems with your printouts.

Troubleshoot
Most printers have a troubleshooting option. Go ahead and run your computer’s troubleshooting program for your printer. Windows users can reach this through the Control Panel, while Mac users go through System Preferences.

Read the manual
If you haven’t thrown out or misplaced your printer’s manual, it can actually be helpful to take a look through it and check for helpful hints. Manuals also usually have their own specific troubleshooting guides – as well as a tech support hotline.

Defective cartridge
Once in a while, an ink cartridge is simply defective. If the printer is working and you’ve tried everything else, you may just need to replace the cartridge.

Advanced Causes and Fixes

Unfortunately, there are times when the basic fixes just aren’t enough. These fixes take a bit more time and effort, but they can ultimately save you the expense and hassle of either having your printer repaired or purchasing a new one.

Clogged/dirty print head
If the horizontal lines on your printouts are black or in colour and are not simply streaks where ink is missing, a clogged or dirty print head is a likely culprit. There are several methods of cleaning print heads, depending on the make and model of the printer. It’s always best to check with the printer’s manufacturer for the recommended method. However, there are some do’s and don’ts that apply regardless of printer brand:

  • DO unplug the printer and remove the ink cartridges before cleaning the print head.
  • DON’T use tap water to clean the print head. Most inks are water-soluble, so purified water is effective and relatively safe to use for cleaning. However, tap water can contain minerals and other impurities that can damage the print head.
  • DO use distilled water to clean the print head.
  • DON’T use compressed air to blow out print heads or nozzles. These parts are delicate and can be damaged by compressed air.
  • DO consider cleaning the backside of the print head assembly if cleaning the print head alone does not resolve the problem.

Defective print head
If after cleaning the print head assembly there are still unwanted lines, the print head may be defective and should be replaced.


If All Else Fails

Sometimes there’s truly nothing to be done except to either take the printer in to be serviced or buy a new one altogether. If it comes to that after trying the above fixes, at least you’ll know you did everything possible first.